Page 2
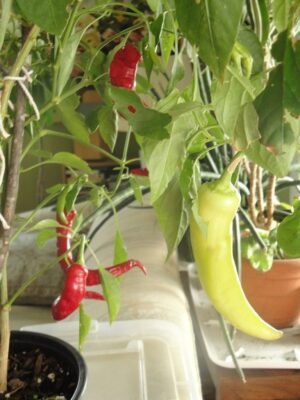
‘Jimmy Nardello’ Italian frying pepper.
Tip #3: Caring for Your Potted Peppers
Direct Sunlight and Temperature
Give your potted peppers as much direct sunlight as possible—at least 7 hours each day. With days growing shorter, they’ll need every minute of strong sunlight to grow and to maintain the foliage they have. Indoor sun is much weaker than outdoor sun because glass reflects and absorbs much of the intensity of the light. Also, light comes from only one direction—through the window—in most homes, so plants can’t benefit from light coming from other angles or bouncing off clouds.
When nighttime temperatures consistently drop below 55°F, bring your plants indoors. For plants that aren’t as robust as you’d like them to be, keep them above 65°. The next morning, after the sun raises the air temperature, move the plants outside until the temperature drops again.
Setting an alarm will remind you to bring the plants indoors. You know what will happen if you forget!
Direct sunlight provides the energy that drives photosynthesis. The more sun the plant gets, the more glucose it can make. Glucose fuels all cellular activities, including root and foliage growth, flower and fruit formation, and making hormones and enzymes.
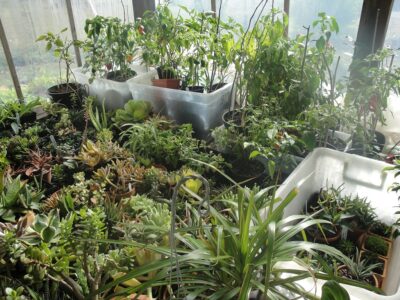
Succulents and potted peppers on the enclosed porch.
For ease of transport, I keep all potted peppers in large plastic bins. On a sunny morning, the bins are pushed out into the enclosed porch, where they bask in the sunshine and warmth (peppers are at the top of the photo, above). When the temperature drops below 55°, they come back indoors for the night. Avoid keeping them near heat registers, where the air is very dry.
At the time of this writing—mid-October—in USDA zone 7b, our average nighttime temperatures are around 50°F, but that’s just an average. This week, the weather forecast is calling for temperatures 10+ degrees lower than that, so I’ve brought in all the basil, peppers, and other tropical plants that need warmer conditions.
Artificial Light
Adding supplemental light can make the difference between the plants thriving… and maybe not doing so well. The more light the plants get, the healthier they’ll be.
So, if you don’t have a protected outdoor space or a sunroom for the plants in the daytime and rely only on light coming through windows, you might need to supplement natural light with artificial light. A few grow bulbs or 2 shop lights (my preferred option) can work pretty well.
Place the plants very close to the source of light, but not so close that they can feel the warmth. Under 4′ long shop lights, each fitted with 2 “daylight” LED or fluorescent tubes, plants should be within a few inches of the tubes. Keep the lights on for 18 hours per day if they’re the main source of light.
Direct sunlight is stronger than most sources of artificial light, although commercial greenhouse lighting systems rival natural sunlight. Artificial light is a must in long stretches of cloudy weather. It’s also helpful where daylength is very short for gardeners in the far north (northern hemisphere) or at the southern extreme. What the lights can’t provide in intensity, they can make up for in duration. That explains the 18 hours.
You might have noticed my repeated emphasis on providing strong light for your potted peppers. In all the years I’ve grown peppers indoors and from customers’ comments, lack of adequate light is the #1 reason for failing with any sun-loving plant.
Water for Potted Peppers
Potted peppers should be kept lightly moist, never wet. Because they’re growing in fairly large pots, the soil in the lower 3/4 of the pot might have enough moisture even though the surface feels dry. Stick your finger 2″ into the soil; if there’s any dampness, don’t water yet.
When you’ve grown potted plants for a while, you’ll recognize by the weight of the pot if it needs water.
If the plant is not wilting and skies are cloudy, delay watering. I prefer to water most plants on sunny mornings and when the forecast calls for a few days of sunny weather. In bright conditions, plants photosynthesize, transpire, and respire at an accelerated rate. Consequently, they use that water faster, so it’s less likely to damage roots. However, if the plant is beginning to wilt due to dry soil and the weather is cloudy, give it some water, but not a thorough watering.
Never let excess water collect around the bottom of the pot, in a saucer or a bin; remove it within 15 minutes. Give this water, which has dissolved nutrients, to other plants. Avoid sending that excess water down the drain or into the creek.
Normally, we water fully rooted plants thoroughly, until it begins to drain through the holes. If water rushes through the soil and exits immediately through the drainage holes, there’s probably an air gap between the pot and the outside of the root ball. Firm the soil or use a chop stick or a wooden dowel to force soil into the gap. You might need to pack the soil more firmly when potting up.
In cool weather, use lukewarm water—about 85°F—to avoid shocking the plants. Because I keep my house cooler at night (58-60°), peppers, basil, and other tropicals enjoy lightly warmed water. I’ll even go as far as keeping potted basil plants on top of the 78° aquarium for the night, then returning them to the sunny window in the morning.
Fertilizer

This chives plant is potbound.
Roots of plants growing in the garden can explore quite a distance from the stem for the nutrients they need. In a pot, however, roots are restricted to what’s available in the potting soil. Therefore, we need to provide small amounts of nutrients as growth warrants. Most plants thrive when quite potbound as long as they have the nutrients they need.
When my plants continue producing a few peppers during winter months, I give them diluted concentrations of fertilizer, maybe 1/4 or 1/2 strength every 4-6 weeks. Less fertilizer is better than too much. So, if you’re in doubt, don’t fertilize. Use formulations with relatively small numbers, such as 5-10-10 or 14-14-14. Like tomatoes, peppers need calcium to prevent blossom end rot.
An oversupply of nutrient salts in the soil draws water out of the roots, causing a condition frequently referred to as “burning the roots”. Overfertilized plants soon wilt and most die. If you think you’ve applied too much fertilizer, flush 1-2 gallons of clear water through the soil. Collect the leachate, add more water, and use it on plants in the garden.
“Do peppers need fertilizer?”
Plants that look healthy but are not flowering don’t necessarily need fertilizer. They might simply be in a state of semi-dormancy from late December through February, when not much growth occurs other than maintenance of plant tissues.
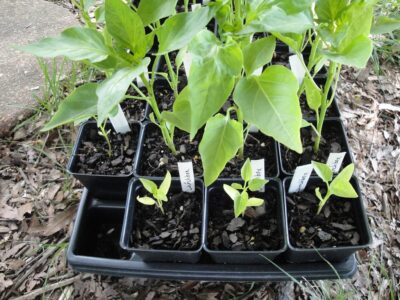
‘Lunchbox’ peppers in 2 1/2″ pots. Small plants did not receive supplemental fertilization; all seeds were sown on the same day.
If plants stop growing leaves or turn pale green, they might need nutrients. Nitrogen is a macronutrient, needed in large amounts compared to other nutrients. Nitrogen helps the plant grow new foliage. When plants are young, use products with higher nitrogen levels. Once they approach the flowering stage, use less N and more phosphorus (P) and potassium (K). All fertilizer labels include 3 numbers, such as 21-8-14, representing 21% nitrogen—8% phosphorus (phosphate)—and 14% potassium (potash), always in that order.
There are thousands of molecular activities going on inside plant cells, and each nutrient plays an important part in many of them. Surprisingly, plants need only 16-20 elements, so skip the products that advertise they contain half the periodic table.
Avoid fertilizing plants if the soil is very dry. Water, and then fertilize a day or two later. Some nutrients in a fertilizer solution can be absorbed when sprayed on the foliage. Wait a few weeks after potting up to begin fertilizing peppers, and fertilize less often in winter.
Timed Release Fertilizer
Another option is to add timed release fertilizer when potting up the plants. Some products last 3 months while others last 6-8 months. Apply an amount described on the container as a moderate rate. I add them about an inch below the soil surface so they won’t spill out, wash away, or release nutrients faster in the hot sun.
Nutrients inside the little prills release faster at temperatures above 70°, so you might need to reapply or use a different fertilizer before those 3 or 6 months are up.
During the main growing season, in summer, I usually use timed release fertilizer in smaller amounts and supplement with a liquid or granular organic product.
“Should I use organic fertilizer?”
For greens and vegetables in containers and for those growing in my gardens, I use organic products most of the time. Fish emulsion, SeaPlus, compost, aged cow manure, earthworm castings, the Espoma brand of fertilizers, and others provide nutrients and help sustain the plants and populations of microbes.
Living microbes consume and break down organic matter in the soil, releasing simpler nutrients when they die. This natural process happens continuously in all healthy soils.
Some gardeners prefer the chemical (or synthetic) fertilizer products. In my opinion, using them does not make produce toxic since organics and synthetics break down to similar compounds. The plant reconfigures those nutrients into useful substances needed for normal growth.
Organics, however, add microbes, increase crop yields, and provide some protection from harmful microorganisms. They improve the quality of the soil for long-term production. Organic fertilizers have low numbers on the package, such as 3-5-4 or 5-1-1, but they release nutrients over a longer period of time.
Regular use of chemical fertilizers harms populations of microbes and earthworms. Incidentally, since microbes aren’t working in cold soil, I use synthetic fertilizer once or twice in cold weather. This maintains vigor for the hardy greens growing through the winter in outdoor gardens.
Insects and Spider Mites
Spider mites on Alocasia.
Many plants serve as hosts for hungry aphids and spider mites. You might also occasionally see caterpillars, found on partially eaten leaves. I pick them off and feed them to the 40-year-old salamander.
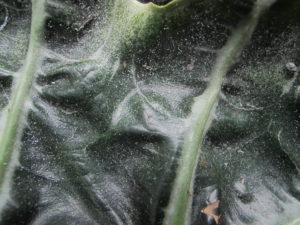
Spider mites cause tiny light-colored dots on the leaf surface as they feed from and kill those cells. Their populations can build up very fast at warm temperatures, when you’ll see fine webbing and dusty debris on the leaves.
On this Alocasia, a tropical houseplant, you can see the tiny spots caused by spider mites. The damage looks similar on pepper plants.
Outdoors, wind, rain, and predatory insects keep their numbers in check. But in the protected indoor environment, we need to keep a watchful eye. Fortunately, spider mites drown easily, so a heavy misting or a brisk rinse under the garden hose will kill most of them. Do this on a warm day; test the temperature of the water coming out of a hose sitting in the sun. If the problem persists, use a dilute solution of horticultural oil (not neem, dormant, or vegetable oil) sprayed on all surfaces to kill the mites and their eggs. Be careful; it makes surfaces slippery. Read the label.
Populations of aphids also build rapidly in warm temperatures. They reproduce by giving birth to live young. At certain times of the year, they mate and produce eggs, but we deal primarily with live bearers. A vigorous spray from the garden hose and horticultural oil work against aphids, as well. These and several other insects excrete “honeydew”, derived from the glucose-rich sap the aphids feed on. This substance appears as a clear and sticky layer on foliage beneath where the aphids are feeding.
You might not see these pests for the first month or two your potted peppers are living indoors. But after enjoying your warm hospitality, they could show up. Scout for them regularly, and treat the plants right away.
Beneficial Insects
If I see ladybugs hanging around the warm porch, I place them on a pepper plant with aphids. The ladybugs go to work immediately, helping to keep the aphid population down.
Another beneficial insect is the tiny non-stinging braconid wasp. An adult female lays eggs in an aphid, and the tiny larva feeds on the aphid’s soft interior. Thousands of braconid wasp species work around the globe, unseen and underappreciated.
-

- A parasitic wasp, aphids, and aphid mummies.
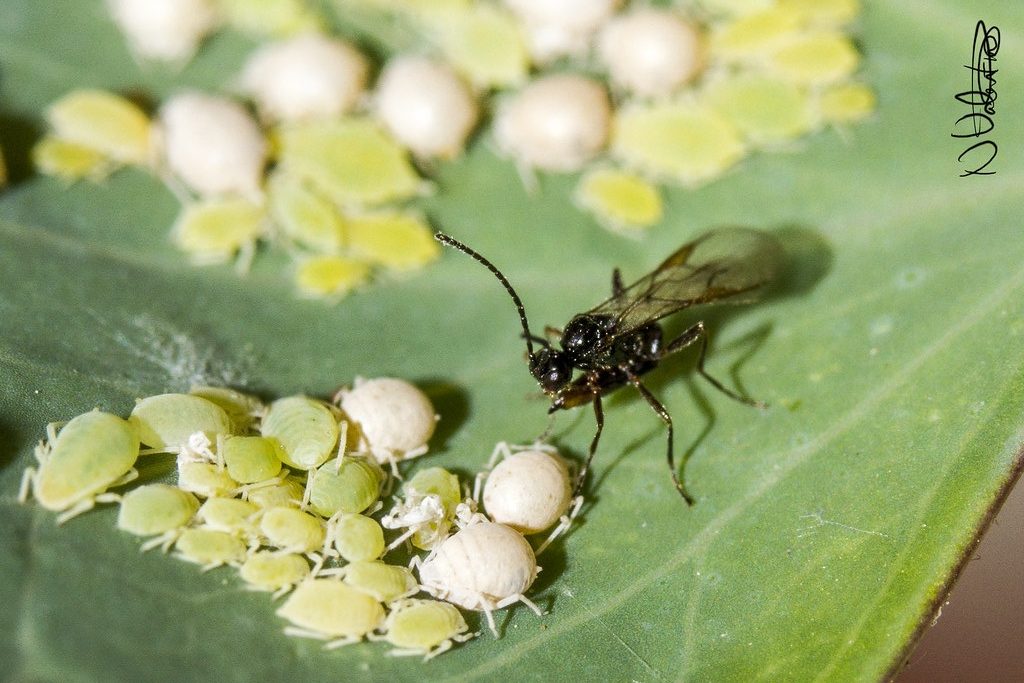
-
- Tan-colored aphid mummies have been hollowed out by the wasp larvae.

Tip #4: Pollinating Your Potted Peppers

Sweet bell pepper.
In the cold months, you might occasionally see honey bees collecting nectar and pollen from winter bloomers outside. But their visits are limited to mild winter days and the pollinators can’t be counted upon to pollinate your peppers. So, how can we get the flowers pollinated?
Plants in the Solanaceae family, including peppers, tomatoes, and eggplants, have “complete” flowers. Each flower contains both male and female reproductive parts. In other words, the flowers are self-pollinating in the right conditions. All we need to do is to loosen the pollen grains from the anthers and get them to land on the receptive stigma in the same flower.
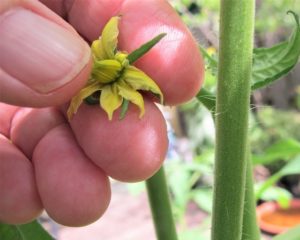
‘Cherokee Purple’ tomato.
Easily done. No, you don’t need a paintbrush to transfer pollen from one flower to another. When the flower is fully open, simply tickle or tap the flower. I use a fingertip to gently flick the flower parts extending outside the petals. The important parts are mostly enclosed within the flower. That vibration is sufficient to move dry pollen grains to the stigma. In these photos, I’m pollinating a pepper and a tomato.
For plants still outside in the garden, wait for the dew to dry. Pollinate flowers that opened that morning or the day before; older flowers won’t successfully pollinate.
If not enough pollen grains stick to the stigma, the plant will reject the fruit. It will shrivel up, turn yellow, and fall off when it is still very small.
When very high summer temperatures kill the pollen in your garden peppers and tomatoes, hand-pollinate dry, open flowers before the pollen is damaged. Pollinating them early in the day could increase the yield during those hot midsummer days.
Tip #5: Fruits from Your Potted Peppers
A few days to a week after pollinating the flower, you’ll seed a tiny green fruit beginning to grow. Success!!
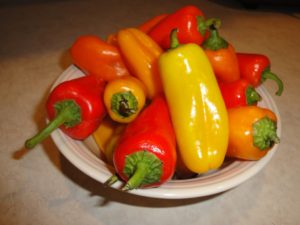
The fruit is ready to harvest once it has reached its mature size. That could be 2-3″ long for a ‘Lunchbox’ pepper, 5″ for one of the larger bells, or over 8″ for ‘Jimmy Nardello’. A mature green fruit tastes sweeter than an immature green fruit, but they’re both edible.
Wait another 2-3 weeks, and the fruit will change color. Small sweet peppers and hot peppers turn color a bit earlier than the larger bells. Red, orange, and yellow ripe peppers have more vitamin C and beneficial antioxidants than the green ones.
The ripe color of a pepper is determined by the cultivar, although some change color as they mature, from green to yellow, orange, and then red. But an ‘Olympus’ will always ripen red and a ‘Flavorburst’ will always ripen yellow-orange.
As with many types of peppers, a small percentage might have a flavor that is hotter than expected. If both young fruits and ripe ones on a healthy plant are distasteful, compost the plant. A pepper yielding flavorful fruits in summer should continue growing flavorful fruits after being potted up.
Use pruners to harvest the peppers. Snapping the fruit sometimes results in part of the branch detaching from the plant.
No New Fruits?
A potted pepper with a few or several ripe (colorful) peppers seems to stop growing. There might not be any new foliage or flowers visible on the plant.
A plant’s goal in life is to make seeds for the next generation. So, the plant concentrates all its resources into maximizing seed viability. Growing new flowers would divide those resources, so, instead, the plant stops blooming. The products of photosynthesis are sent to the existing maturing fruits with their young seeds inside.
A week or two after those ripe fruits are harvested, you’ll once again see flower buds. If it’s near the middle of winter, though, the plants might not flower again until the days begin to substantially lengthen, in early spring. For the earliest flowers, give the peppers abundant sunshine.
Hand-pollinating the flowers in early spring guarantees fruiting before the potted peppers are returned to the summer garden. They can stay in their pots or you can plant them into the garden—after frost is over—for an early harvest. If necessary, transplant them into larger pots for growing on the patio or balcony. You’ll be the first one on the block with those ripe bell peppers or a handful of jalapeños!
Lunchbox peppers.
Headings
Page 1: Autumn Has Arrived (Why would we grow potted peppers in winter?, Early Fruits Next Summer), Tip #1: Start with Healthy Transplants, Tip #2: Transplanting Potted Peppers (The Pots, The Potting Soil, The Process, The First Watering, Varieties of Potted Peppers I’m Growing This Year)
Page 2: Tip #3: Caring for Your Potted Peppers (Direct Sunlight and Temperature, Artificial Light, Water for Potted Peppers, Fertilizer, Timed Release Fertilizer, “Should I use organic fertilizer?”, Insects and Spider Mites, Beneficial Insects), Tip #4: Pollinating Your Potted Peppers, Tip #5: Fruits from Your Potted Peppers (No New Fruits?)
You’re welcome!
I found your explanation incredibly helpful, thanks!