Page 4
Tip #8: A Simple Cold Frame For Cool Season Vegetables
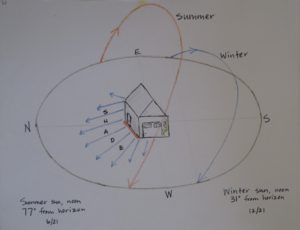
The sun is at its lowest point in the sky on the first day of winter, the shortest day of the year. In order to capture the most energy from the sun, crops should be open to the southern sky, in the northern hemisphere, from the southeast to the southwest. Every hour of the sun’s warmth counts during these short days!
As daylight hours lengthen in late winter, expose the crops to the eastern and the western sun as well.
What’s a Cold Frame?
A cold frame is a structure that supports a clear covering and protects plants from the harshest winds and temperatures. It’s used as a transition zone, to harden off tender seedlings in spring before planting them into the garden. It can hold dormant plants that would perish in the cold, outside their “comfort zone”, and is useful for forcing pots of spring flowering bulbs.
A frame also protects cool season vegetables from the bone chilling realities of outdoor living from fall through early spring.
Some gardeners use an old glass shower door over bales of straw. Or the framework can be constructed from naturally rot resistant wood (e.g., cedar) or cinder blocks. Cover with old storm windows (don’t use those with lead paint), sheets of clear acrylic, or plastic film on a supporting grid for the cover. Figure out a way to secure all parts so they won’t blow around in high winds.
Hinges and the means to prop open the cover without letting it fly open in the wind adds functionality to the cold frame. It will need to be vented on sunny days to keep the air inside cool and refreshed. Slope the cover to shed water, and make sure it’s reinforced so it can drain without collapsing.
Although some styles of cold frames can be disassembled and stored off-season, many gardeners choose to keep durable structures in place all year. Ask any keen gardener “Why?” and you’ll probably get a list of reasons. Many greenhouse operators I’ve visited have built permanent cold frames on the south sides of their structures.
So, What Can I Grow?
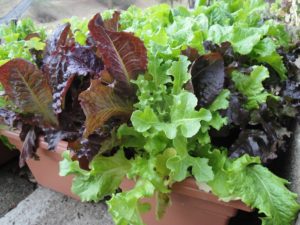
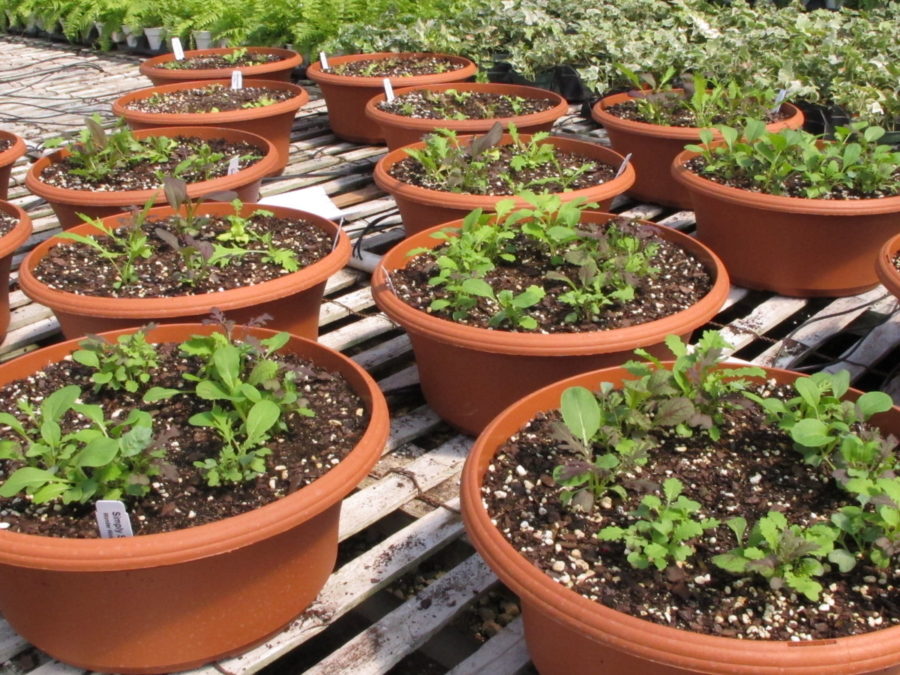
Mixed lettuces in 7 x 18″ planters.
Shorter greens and vegetables can be grown in cold frames…lettuce, arugula, radishes, carrots, beets, green onions…spinach, Swiss chard, kale, mustard greens, tatsoi, pac choi… There are lots of cool season vegetables and greens suitable for growing in a frame. They can grow in shallow pots or directly in the soil.
Larger crops, such as leeks, broccoli, cabbage, and cauliflower can grow in a frame with more generous proportions.
Crops planted in the soil are better protected from cold than those growing in pots. Warm season crops will not survive the chill. So, tomatoes, peppers, zucchini, beans, basil, and cucumbers must wait for settled spring weather or a heated greenhouse.
Getting Fancy
You can find mail-order kits that are assembled with transparent twinwall polycarbonate glazing and aluminum framing. They can be quite expensive, but “would make a lovely gift”. Others with single glazing are available at lower cost. Use stakes and weights to anchor the structure to the ground and employ all safety features. In high winds, these materials can cause extensive damage to property, not to mention personal injury.
With a compass, locate true south. Glazing that slopes in this direction will receive the most sunlight on the shortest days and will shed rain and melting snow.
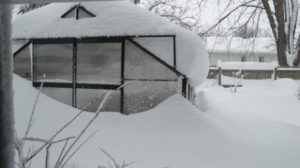
A coat of fresh fluffy snow on top of the frame and on the ground around it helps insulate the plants inside. Make sure, though, that heavy snow won’t collapse the cover; remove most of it. Don’t let it shade the plants inside for more than a few days. You could remove some of the snow to let the plants get some sun and replace it in late afternoon. This blanket of snow keeps the plants in better condition during brutal turns of weather.
An old quilt or moving blankets can provide extra protection on really cold nights. Cover the material with plastic sheeting to prevent it from becoming water-soaked on damp nights. Wet materials lose most of their insulating capability. Have any large sheets of bubble wrap hanging around?
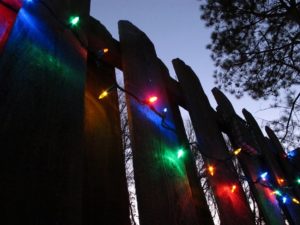
And then, of course, you can add a string or two of those trusty Christmas lights mentioned in Tip #6.
Sinking to Lower Depths
There is another step you can take to further protect cool season vegetables in a cold frame. This is especially helpful in colder climates. Remove the rich topsoil and set it aside. Dig out and place several inches of the subsoil on the north side of the frame to buffer the wind and frigid temperatures. Then, add back the rich topsoil, with added compost, to the soil inside the frame.
I did this is in the West Virginia garden, using many old windows and richly composted soil. Mimulus, nasturtiums, lettuce, and some other crops survived most of the winter. At night, I raked dry leaves on top of the glass.
Or simply plant a patch of ground and build a cold frame around and over it. Pile soil and insulating material around the sides.
Gardeners used to add a hot layer of composting fresh manure under the topsoil. That’s why these structures were called “hot beds”. I don’t think I’d like to eat lettuce that… well, you get the point.
A soil surface within the structure that is several inches to a foot lower than the soil level outside the frame will keep the interior warmer. The frame is drawing warmth from deeper in the ground. Make sure the sides won’t cave in if the frame sits on the soil surface. This situation can be avoided by using wood (such as 2″ x 6″ boards) and some nifty carpentry, to reinforce the interior and as a foundation for the above ground parts.
Cover the Soil Around the Cold Frame
But remember, the cold will affect the interior if the cold air is close to the interior, so mulch the ground several feet out from the frame to help hold warmth in the soil next to the frame. An airy mulch, such as a thick layer (6″ to 12″) of straw or pine needles, works better than exposed ground.
Stuff black trash bags with sheets of styrofoam, packing peanuts, dry oak leaves, or collapsed cardboard boxes. Place them against the cold frame. Secure them to the ground, but don’t shade the plants. Be resourceful! Once these materials become wet or compacted, they’ll lose most of their insulating value. Black bags absorb more of the sun’s warmth than light-colored bags.
Experience and hints from fellow gardeners can address your particular growing concerns. Homesteading manuals and videos offer lots of suggestions.
The Maryland Cold Frame
This is the arrangement that I set up in autumn for the last eight years I lived in Maryland. A horticultural supply wholesaler had some unclaimed sheets of twinwall polycarbonate, which I was oh so happy to purchase. This material is extremely strong, long-lasting, and can be cut with a utility knife, if necessary.
Picture clear plastic straws, all lined up side by side; that’s what twinwall polycarbonate is. You can see the channels faintly lined in the photograph, right. The ends were open, so I taped them to exclude dirt, worms, condensation, and earwigs.
These large sheets didn’t need trimming, but a greenhouse kit using the same kind of glazing did need a little tweaking. I built the small greenhouse not far from the cold frame.
Let me remind you that I was running my horticultural company on less than 1/5 of an acre of property for the 29 years we lived in that house. So, how every square foot of space was used was a business decision.
For 16 years, I was given permission to use a larger greenhouse at a local school in exchange for mentoring students one morning a week. When that program ended, I bought the greenhouse kit and enlarged the area covered by cold frames.
Construction Details
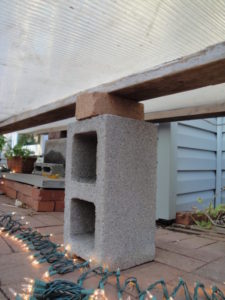
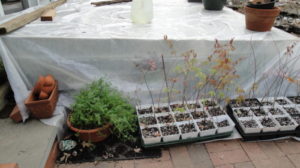
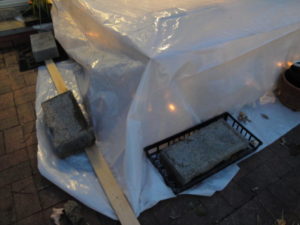
With several cinder blocks, some bricks, and a few 1″ x 3″ boards, I cobbled together, on top of the brick patio, a workable and satisfactory cold frame. The south-facing slope was created by propping the north end of the glazing on bricks. And the entire structure was enclosed, top and sides, in a large sheet of clear 4-mil plastic film.
For many years, I grew surplus succulents, cyclamen, and, of course, lots of cool season vegetables and greens in somewhere between 150 and 200 square feet of covered space. On the far end, storm windows covered some crops that grew in the ground, notably the ‘Nabechan’ bunching onions. Otherwise, most greens grew in wide, shallow pots, similar to those in the photograph below. Since I needed the produce often, the pots were placed near the edge of the frame for accessibility.
Lights!
In the cold frame and in the greenhouse, several strings of Christmas lights (Tip #6) provided gentle warmth. They snaked around the pots, on top of the brick patio, warming the soil and the foliage as the heat rose. A rather low ceiling kept the heat close to the plants and minimized the volume of air that had to be heated.
Similarly, Christmas lights heated the interior of the greenhouse. I placed strings of lights under short benches (bricks and 2 x 4’s), where flats of succulents stayed all year. There was no other source of heat besides the sun and the lights. Two or three layers of clear plastic covered the succulents in the center of the greenhouse, while potted crops lined the colder perimeter. On colder nights, I laid old blankets over the plastic.
 All of this was just a few steps outside the kitchen door, and a flip of the switch from indoors regulated the lights. I added an outlet adapter to the porch light, which accepted 2 indoor/outdoor extension cords—one for the cold frame and one for the greenhouse. Strings of lights were plugged into the cords. Easy!
On sunny days, even in winter, I opened the plastic cover to allow heat to escape and fresh air to enter.
Remember to add weights to the plastic flange and over the cinder block supports, because of wind.
Tip #9: A Lean-To
Let’s imagine a lovely blank brick wall next to the concrete patio in the back yard. It faces south, and—wouldn’t you know?—it’s close to the kitchen, an electrical outlet, and the faucet! There are no trees or buildings blocking the sun. That would be a great spot for a lean-to.
What’s a lean-to? Basically, it’s a structure that has a sloping roof, with the apex and one or two sides attached to a solid wall, in this case, the house. A lean-to could have solid walls, as a storage shed, or it can have clear glazing, preferably double-skinned.
For the maximum amount of solar gain in winter, on any structure, the glazing would be perpendicular to the winter sun’s rays at mid-day. But most people build them with vertical sides. Sloping sides also have more square footage exposed to the cold, so factor that into the design.
A lean-to is built borrowing the house’s brick wall, so it can stay fairly cozy during the winter. Brick is a thermal mass that absorbs solar energy during the daytime and releases it slowly at night. And, because it’s shielded from prevailing winter winds, this would be a fabulous spot to build a permanent growing space or conservatory. A floor constructed from thick dark flagstones absorbs the sun’s energy during the daytime, releasing it at night. Permanent structures might require a permit for construction.
Your climate will dictate the amount of additional heat required and the crops you can grow. Keep it safe, and don’t use a space heater in a humid atmosphere if it was intended for indoor use. Maybe you already have a mudroom or a sunroom that can be adapted to accommodate several pots of your favorite cool season vegetables.
Enclosing the Porch
(***Update***: This section added 1/31/2025.)
Enclosing a sunny porch can be considered another type of lean-to.
The first time I enclosed a sunny porch with clear plastic (from the hardware store’s paint department) was in sometimes brutally cold Morgantown, West Virginia. That was in the 1970’s, and this project instantly convinced me of the benefit.
As long as the sun shone, temperatures outside in the teens felt like a tropical paradise inside the porch. This is due to infrared rays of the sun getting trapped inside the enclosure. By opening the front door during daytime hours, that warm air permeated the chilly interior. I don’t think the second story ever exceeded 55° in that old farmhouse!
I also secured removable clear plastic panels, on wooden frames, to the drafty single-pane windows as makeshift storm windows. Much better. That was before heat-shrink window film became available, and way before modern glazing that reflected heat back into the interior.
Here in the Piedmont of North Carolina, I enclosed the porch—during the winter months—using the hardware store’s 4-mil clear plastic. But the plastic began to deteriorate after 2 winters. So, when longer-lasting 6-mil greenhouse film went on sale from a greenhouse supplier, I bought a large roll for the porch and for other planned projects.
From the end of December through most of January 2025, a prolonged period of extreme cold descended from the Arctic. Most days were 10-20 degrees below normal, day and night. Many flats of succulents spent the winter in the enclosed porch. At night, these tender plants stayed under an additional bubble of plastic and blankets, and above strings of incandescent Christmas lights. But they would have died if the temperature had gotten close to freezing.
Because of the severe cold, I added a second layer of greenhouse film, using a staple gun to secure the film to the wooden grid. A dead air space between the two layers of plastic provided additional insulation and obviated the need to bring hundreds of small plants into the house. Much better! Outdoor temperatures often dropped to 12°F at night, but the protected plants never felt anything colder than 45°. After the second layer of greenhouse film was added, it froze only a few times at the perimeter of the porch floor, outside the bubble.
How to Use a Lean-To
Here, the potted summer vegetables will continue to ripen their fruits for another month or two beyond the first fall frost. Place these in the warmer locations, perhaps elevated off the floor. Look for warm and cool microclimates within the structure.
Lasagna pots, filled with a potential bounty of spring flowering bulbs, can overwinter in the colder locations.
Enjoy freshly harvested ‘Rouge d’Hiver’ and ‘Salanova’ lettuces, Swiss chard, beet greens, and dinosaur kale for salads. Trellised snow peas and spinach are easy to grow in pots.
I grew sustainable ‘Nabechan’ bunching onions in the Maryland cold frame for several years. When cutting a stem, aim well, leaving the bottom 1/2″ to 2/3″ of the stem and the roots in the ground. A few weeks later, a new onion will sprout. In colder weather, though, they take longer to regrow, or they’ll remain dormant until warm weather returns.
Potted Herbs
Let’s not forget the herbs, which adapt very well to living in pots. A few compatible types can grow together in pretty clay planters. Larger combination pots, with greater soil volumes, won’t cool off as quickly as smaller individual pots.
I’ll start with basil, which is a decidedly summer herb. It does not like temperatures consistently below 60F. If you want fresh basil in winter, grow it indoors. Now, on a nice day, you could place a potted basil in the lean-to for the day, but if it cools off at night, it must go back indoors. Start with a young, healthy basil plant in autumn. It could last all winter without going to flower, as an older plant will do.
Some herbs are evergreen perennials, such as sage, rosemary, bay, and thyme, but they can lose some foliage outdoors in winter. Parsley is a cold-tolerant biennial, so I replant it yearly. These herbs will stay in good condition if the temperatures remain above 40° or 45° at night, but they’ll survive colder conditions. Even short-lived cilantro can grow in a cool lean-to.
Chives, oregano, marjoram, mint, bronze fennel, dwarf winter savory, and French tarragon are herbaceous perennials. They can tolerate cold and even freezing temperatures but enter dormancy when it gets cold enough. As weather warms in spring, they’ll grow new stems and leaves. These herbs grown in pots, in a protected environment, can stay in leaf and grow all winter.
Add a bistro table, a couple of chairs, and your morning coffee to complete the idyllic setting. A handy person could build something, or she could go all out for one of those beautiful lean-tos, with a stone kneewall. Check out Hartley Botanic and Lord and Burnham structures, or find more affordable kits.
Tip #10: The Greenhouse, Finally!
Okay, you’ve got a few years of vegetable gardening know-how under your belt, and you have no plans to move… A greenhouse, finally!
A greenhouse is similar to a lean-to, but it’s free-standing. You can find lots of online mail-order DIY greenhouse suppliers. Or talk with greenhouse representatives at early spring home and garden shows.
Get all the information you need concerning greenhouse management, which plants you intend to grow, materials, cost of running it each season, and tricks you can use to conserve energy and water. Ask local zoning offices and homeowner associations if your project will need permits. They normally do, for most structures with foundations.
Because it is independent of the house and the garden, you’ll need paths to get from one to the other. Have contractors connect utilities and systems (water, electricity, heating, ventilation). Ask about different flooring materials—gravel (don’t use rounded gravel; it’s harder to walk on than angular-sided sharp gravel), concrete, stone…? A solid floor is easier to clean.
Examine the aesthetics of possible locations. Would it look good here or will it block your view of the kiddie pool? Is there enough direct sun? How soon will the neighbor’s trees cast shade? How much snow and wind do you get? If golf balls from the club next door occasionally end up in your yard, is glass a wise choice?
Hire a knowledgeable consultant for valuable suggestions you might not have considered.
Concluding
I confess to enjoying the cool season vegetables and greens more than I do the warm season crops. And, because there are so many options for helping them get through the winter, it’s not difficult to achieve. But I will always cover the tomatoes in October, and I will always plant new ones in April.
Headings:
Page 1: Ready For Fall?, Where There’s a Will, There’s a Way (The Advantage Of This Latitude), and Succession Planting: Warm, Then Cool Season Vegetables (Peas, Yummy!, Gather Information)
Page 2: Seed or Transplant? (Seeds, Temperature, Transplants, More Favorites), Crops With Ornamental Edible Leaves (Tender Leaf Kales), Crops That Form Heads, Soil Fertility (The Importance of Microbes), Nutritional Benefits, and Ready For the 10 Tips?
Page 3: Tip #1: Move Tender Plants Indoors, Tip #2: “Quick! Cover Up!”, Tip #3: The Hot Water Bottle, Tip #4: Low Tunnels, Tip #5: Deal with the Wind, Tip #6: Add Christmas Lights, Tip #7: I’ll Have a Double
Page 4: Tip #8: A Simple Cold Frame For Cool Season Vegetables, Tip #9: A Lean-To, Tip #10: The Greenhouse, Finally!
